
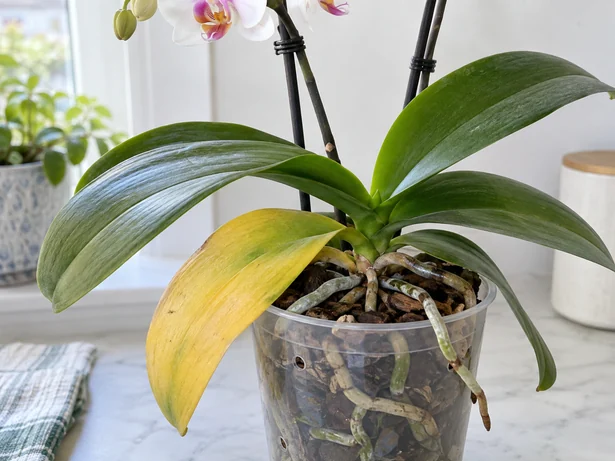
Which leaf changed first?
An oldest leaf near the base can gradually yellow and dry while the newer leaves and roots remain healthy. That pattern is different from several leaves yellowing together or the newest leaf loosening from a soft center.
Take a photograph of the whole plant and a closer image of the affected area. Compare over time. A photograph of one detached yellow leaf removes the information needed to interpret its position.
Several causes can overlap. Use leaf position, root condition and pot moisture to choose the next check; color alone is not a diagnosis.
One oldest leaf
Check the rest of the plant. Slow yellowing at the base can be normal aging when newer leaves, roots and the crown remain firm.
Several leaves
Check roots and moisture. A wet pot with failing roots needs different action from a dry pot with sound roots.
An exposed patch
Review light and heat. A pale patch facing a hot window can fit exposure damage. Soft or spreading patches need prompt assessment.
| Pattern | Check first | What to do next |
|---|---|---|
|
One oldest lower leaf, changing slowly; rest of plant firm
|
Natural aging
|
Monitor; preserve the remaining healthy tissue.
|
|
Several yellow leaves with a heavy, wet pot
|
Root dysfunction or deteriorated medium
|
Inspect roots and drainage before adding water.
|
|
Pale or damaged patch on the window-facing surface
|
Excessive light or heat exposure
|
Remove the immediate exposure and inspect the pattern.
|
|
Yellowing with limp leaves and genuinely dry roots and mix
|
Insufficient water supply
|
Confirm healthy roots, then restore thorough watering.
|
|
Soft crown, loose new leaf or rapidly spreading wet damage
|
Serious tissue damage or possible disease
|
Separate the plant and seek a closer assessment promptly.
|
|
Yellowing with visible insects or sticky residue
|
Pests or related damage
|
Isolate and identify the pest before treatment.
|
Check inside the pot
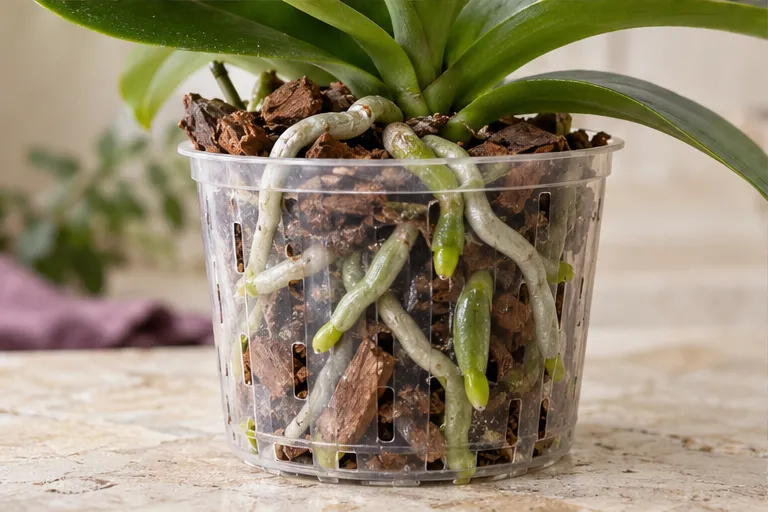
Lift the inner pot out of its cover. Empty standing water and inspect the roots you can see. Is the mix still wet deep inside? Are the roots firm, or do several look soft and collapsed?
A plant with impaired roots can be dehydrated above the pot while surrounded by water below. More watering will not restore damaged roots. Follow root-rot checks if the mix is persistently wet and the roots are compromised.
If the pot is genuinely dry and roots remain firm, review the watering method. Small splashes can leave bark unevenly wetted. Use a full water-and-drain approach; see how to water orchids.
Review light and temperature
Did the plant move into a sunnier window? Was it left against hot glass, near a heater or in a cold car? Exposure damage often has a location and timing that fit the event.
Filter strong light or move the orchid away from the immediate heat or cold source. Do not swing from a hot window to a dark room as a permanent solution. The plant still needs suitable light for healthy growth.
A damaged patch may remain after the cause is corrected. Judge success by whether new damage stops and the remaining plant stays healthy, not by expecting the original patch to become green again.
Do not guess at nutrients
A long-term nutrient imbalance can affect foliage, but yellow leaves do not prove that the plant needs more fertilizer. Excess salts, poor roots and inadequate light can complicate the picture.
Check what product you use, the actual dilution and whether the mix has been flushed or replaced when needed. Do not combine several supplements to treat an unconfirmed deficiency. A declining plant is not helped by escalating fertilizer concentration.
If light, roots and watering are already in order, review the feeding history in how to fertilize orchids.
Should you remove the leaf?
Do not cut a green-and-yellow leaf just for appearance. Keep the healthy tissue that remains. An old leaf that becomes fully dry and releases readily can be removed without pulling on the crown.
If tissue is wet, soft or rapidly decaying, that is a different situation from normal aging. Separate the plant, keep tools and runoff away from other orchids, and obtain help with identification. A photograph cannot reliably tell you which pathogen, if any, is involved.
Do not peel firmly attached leaf bases or cut into the plant's central stem. Aggressive tidying can turn a cosmetic concern into a wound.
When to act quickly
Inspect the plant the same day if several leaves change rapidly, the newest leaf loosens, or the crown becomes soft. Move it away from other orchids if disease or pests are possible, and do not share its runoff or soaking water.
For spreading, water-soaked patches or continuing crown decay, contact a local plant diagnostic clinic or orchid society. Photograph the whole plant, both leaf surfaces, the crown and the roots; include the watering history and when the change began. A leaf color alone cannot identify the cause.
What to watch next
Write down the affected leaf, pot moisture, root condition and any recent change. After correcting a clear problem, compare new growth and the spread of damage. Do not change light, fertilizer, pot and watering simultaneously unless the condition truly requires those repairs.
A stable orchid can retain the evidence of an old problem. The next leaf and new root growth usually tell you more about the current routine than an old yellow patch does.
Common questions
Can a yellow orchid leaf become green again?
An aging leaf or a permanently damaged patch will not turn green again. Judge recovery by healthy remaining leaves, new roots and whether further damage stops.
Is one yellow bottom leaf a problem?
Gradual yellowing of one oldest leaf can be normal when the crown, newer leaves and roots remain healthy. Check the whole plant before treating it.
Should I fertilize yellow orchid leaves?
Not without checking roots, moisture and recent changes first. Yellowing has several causes, and extra fertilizer can worsen salt stress or damage weak roots.
More Orchid Care Guides
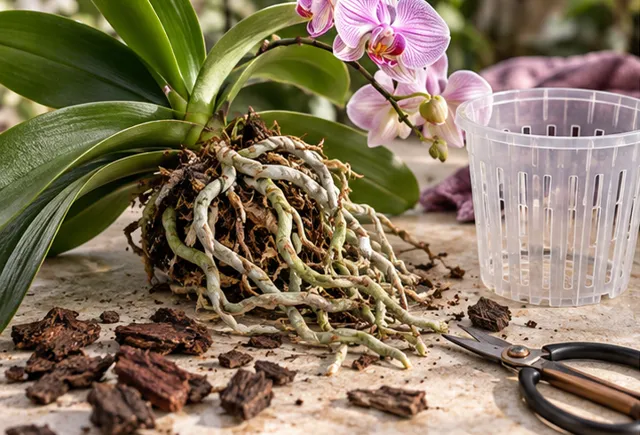
Orchid Root Rot
Inspect soft roots, preserve healthy tissue and repot a struggling orchid without making the damage worse.
Read the guide
Why Orchid Flowers Fall Off
Tell normal flower aging from bud blast, check recent changes and protect the healthy buds that remain.
Read the guide